How is a wooden mallet crafted?
A wooden mallet is an essential tool for woodworkers, used for a variety of tasks such as chiseling, driving dowels, and assembling joinery. Crafting a wooden mallet involves several steps that require careful consideration of materials, tools, and woodworking techniques. By following these steps, woodworkers can create their own homemade wooden mallets that are durable, efficient, and customized to their specific needs.
Choosing the Right Wood
The first step in crafting a wooden mallet is selecting the right type of wood. Common choices include oak, beech, hickory, and maple, which are known for their durability, hardness, and aesthetics. The choice of wood will depend on personal preference and the specific requirements of the project.
Designing the Mallet
Once the wood is chosen, the next step is to design the mallet. The traditional wooden mallet consists of a handle and a head. The head is typically larger and heavier than the handle, providing the necessary power for driving chisels or other woodworking tools. The handle can be straight or have a more ergonomic shape, depending on personal preference.
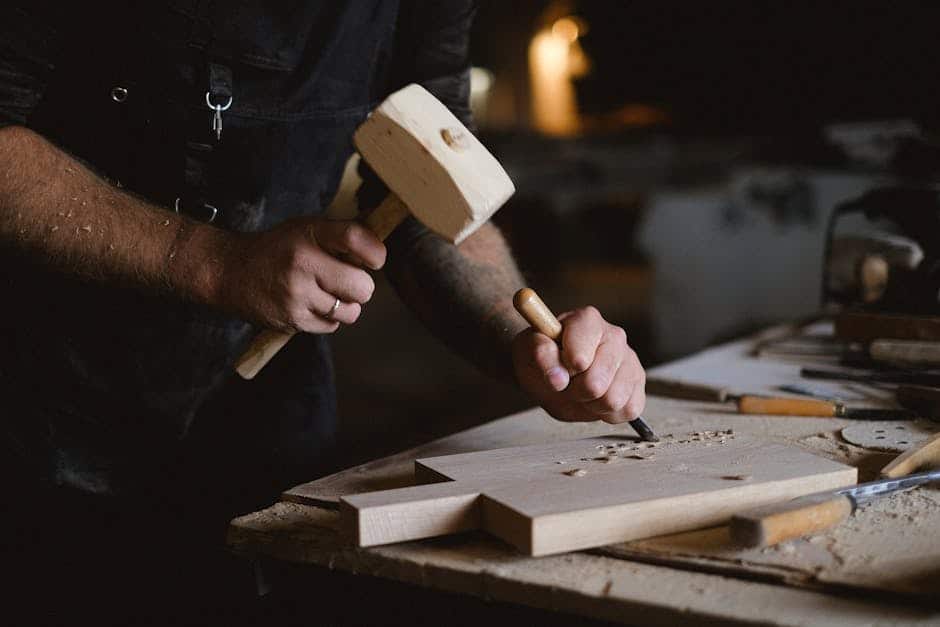
Carving the Mallet Head
After the design is finalized, the wood is cut to the desired dimensions using a saw. The mallet head is then carved out using a chisel. Different sizes of chisels are used to create varying shapes and designs. The head should be carefully carved to achieve the desired weight and balance for effective woodworking.
Making the Handle
The next step is to make the handle of the mallet. The wood selected for the handle should be strong and dense, ensuring it can withstand the force applied during woodworking tasks. Hard maple or oak are commonly used for this purpose. The handle is typically made from 4/4 stock with rift- or quartersawn grain for stability.
Assembly
Once the head and handle are ready, they are joined together to complete the mallet. Wood glue, dowels, or screws can be used to secure the connection, depending on personal preference and project requirements. The handle is inserted into a tapered mortise in the head and wedged tightly to ensure a secure fit. This eliminates the need for glue and allows for easy replacement of the handle if needed.
Adding Finishing Touches
Finally, the rough edges of the mallet are smoothed, curves are shaped, and a polished finish is achieved using sandpaper of various grits. This step enhances the aesthetics of the mallet and ensures a comfortable grip during use. Optional additional steps include using a lathe to turn the handle into a more ergonomic shape and drilling precise holes for dowels or screws if necessary.
By following these step-by-step instructions, woodworkers can create their own homemade wooden mallets that are not only functional but also reflect their personal style and preferences. Crafting a wooden mallet provides an opportunity for creativity and customization while ensuring the tool is durable and efficient for woodworking tasks.
Related Websites:
FAQs:
Q: What are the advantages of using a wooden mallet?
Wooden mallets offer several benefits over other materials. They provide a softer striking surface, reducing the risk of damaging delicate workpieces. Additionally, wood absorbs shock better than metal or rubber, resulting in less strain on the user’s hand and arm. Wooden mallets also offer versatility in woodworking tasks, as they can be used for both delicate and heavy-duty applications. Finally, the durability of wood ensures that a well-crafted wooden mallet can last for years.
Q: What are the commonly used types of wood for making mallets?
Common types of wood used for making mallets include beech, hickory, and maple. Beech is known for its hardness and durability, making it suitable for heavy-duty tasks. Hickory is prized for its strength and shock resistance, making it ideal for heavy striking applications. Maple is a popular choice for its combination of hardness and lightness, providing a balance between durability and ease of use.
Q: What tools are required for crafting a wooden mallet?
To craft a wooden mallet, you will need a few essential tools. These include a saw for cutting the wood to size, a chisel for shaping the mallet head, a carving knife or gouge for carving the handle, sandpaper or a sanding block for smoothing the mallet, and a finish or oil for enhancing the appearance and protection of the wood.
Q: How can I maintain and care for a wooden mallet?
Proper care and maintenance are essential for preserving the longevity of a wooden mallet. It is important to keep the mallet clean and free from debris by wiping it down after each use. Regularly inspect the mallet for any signs of wear or damage and address them promptly. Additionally, store the mallet in a dry area away from extreme temperatures or humidity. Applying a coat of oil or finish periodically can help protect the wood and maintain its appearance.
Q: Why should I consider crafting my own wooden mallet?
Crafting your own wooden mallet can be a rewarding experience. It allows you to customize the design and size according to your preferences and needs. Additionally, it provides an opportunity to develop woodworking skills and gain a deeper understanding of craftsmanship. By crafting your own mallet, you can create a unique tool that reflects your personality and style.


